Getting started with ERPintegrator client
ERPintegrator client is a simple way to send data related to electronic invoicing.
The package consists of two windows programs, fscommunicator.exe and fsviewer.exe.
fscommunicator.exe is the one transporting your documents to and from efacto. It can be run manually from a terminal or automatically by using Microsoft Scheduler.
Before continuing make sure you have an efacto account. Go to
https://efacto.com/erpintegrator/
and signup
Configuration
- Download the zip from the integrations overview
- Unpack the downloaded zip file to a good installation location
- Double click the fsviewer.exe file
- Click "Yes" to specify where the sent folder is located
- Find and mark the sent folder, then click "OK" - this folder will contain the documents sent to efacto. This folder will NOT automatically cleanup itself, you should cleanup this folder from time to time
- Click "Yes" to specify where the outbound folder is located - this is the folder your ERP-system should export documents to
- Find and mark the outbound folder, then click "OK"
- Click "Yes" to specify where the inbound folder is located - this is the folder your ERP-system should import documents and other messages from
- Find and mark the inbound folder, then click "OK"
- Click "Yes" to specify where the error folder is located - keep an eye on this folder. If any error happens, the document will be moved to this folder and NOT sent
- Find and mark the error folder, then click "OK"
- Click "Yes" to specify where the logfile is located
- Find and mark the file named "logfile", then click "Open"
- The configuration is now finished and you can exit the window by clicking the "Exit" button at the bottom right
Testing the configuration
To make sure the configuration is valid, it is a good idea to test it.
- Double click fsviewer.exe
- Change to "Logfile" tab
- Click the "Send data" button
- If one or more log entries appear with status "OK", then the configuration works
Production with microsoft scheduler
To setup fscommunicator.exe to run in microsoft scheduler, follow these steps
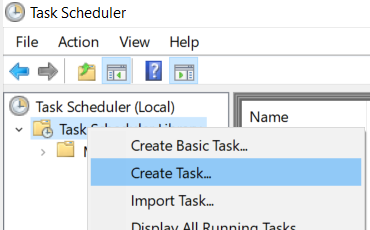
1. Open task scheduler
2. Create a new task
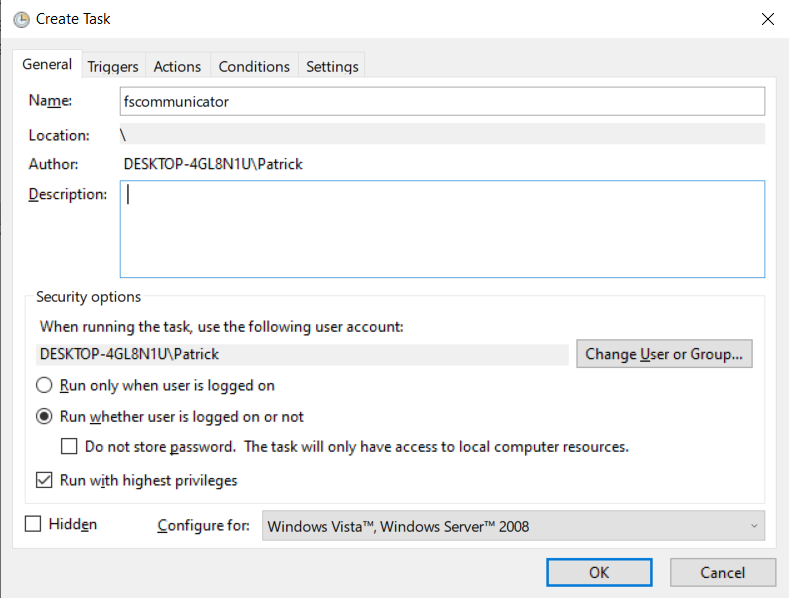
3. Fill out the "General" tab like the image below
Make sure to choose a user that has the privileges to run fscommunicator.exe. Additionally the user should have the permission "Log on as a batch job" located in "Computer Configuration\Windows Settings\Security Settings\Local Policies\User Rights Assignment".
4. On the "Triggers" tab click "New..." and fill out the form like the image below
Set "Start:" to current date, and about 15 minutes into the future. You have to finish this guide before that time.

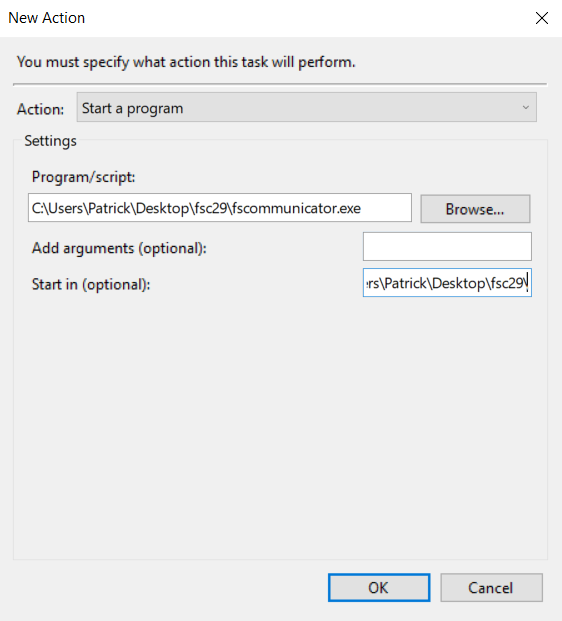
5. On the "Actions" tab click "New..." and fill out the form like the image below
Click "Browse" and choose the "fscommunicator.exe" application (".exe" might be omitted on your system).
"Start in (optional):" Should point to the folder containing "fscommunicator.exe".
6. On the "Conditions" tab uncheck everything
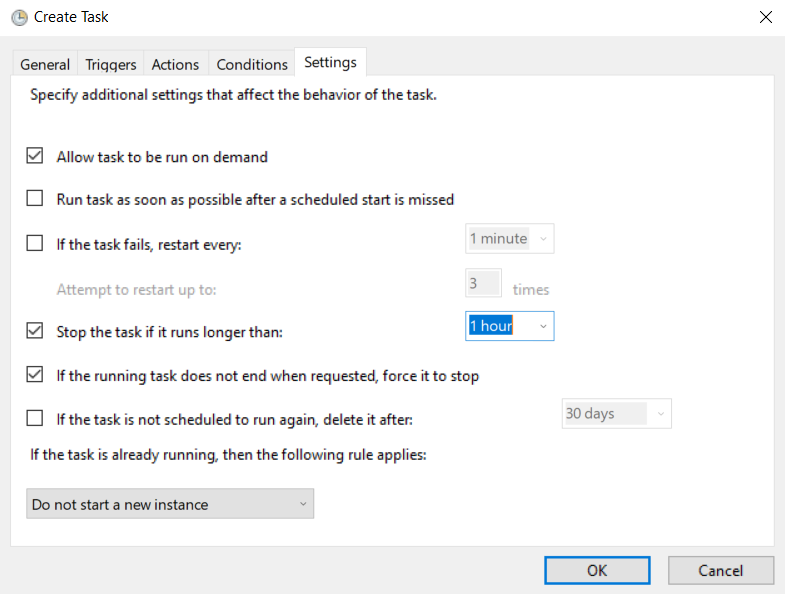
7. On the "Settings" tab fill out the form like the image below
8. Click "OK" and type the password for the chosen user and click "OK"
9. Your task should begin shortly, and should repeat every 1 hour
keep an eye on the error folder. If any error happens, the document will be moved to this folder and NOT sent to efacto!